Showing posts with label miniature games. Show all posts

Tuesday, 31 July 2012

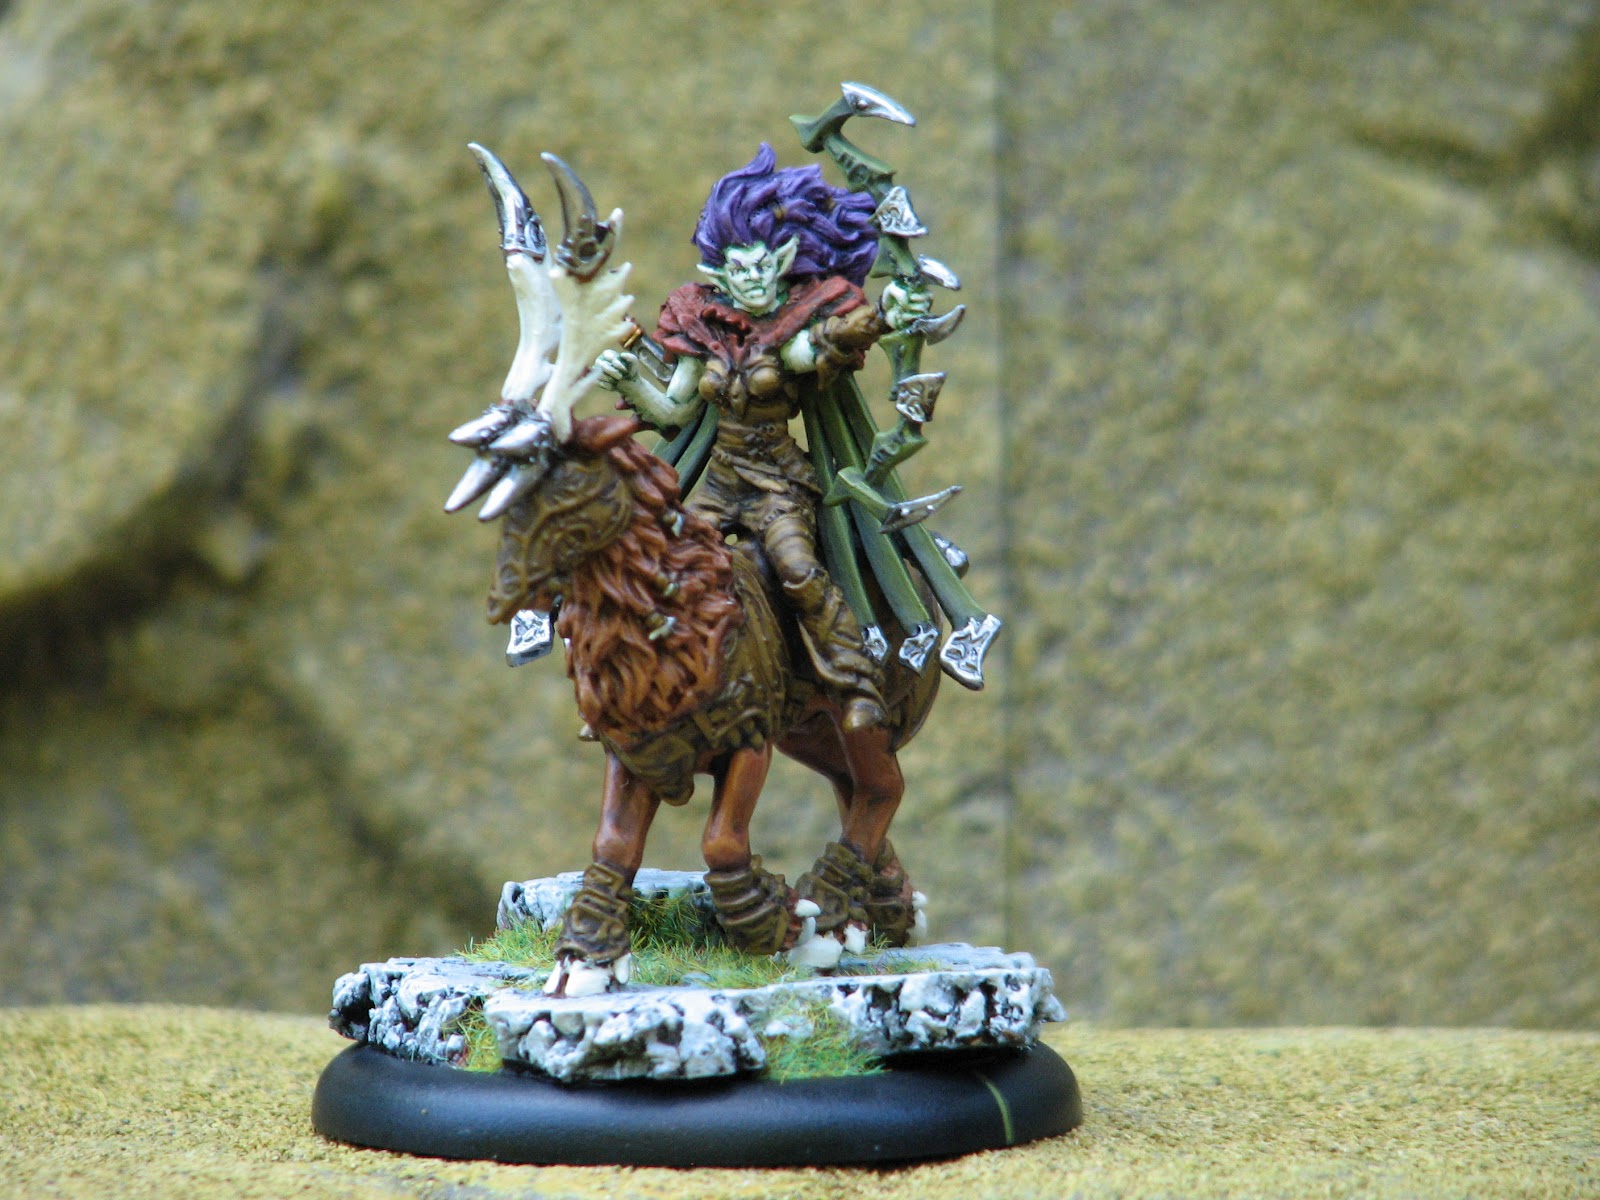
Annyssa Ryvaal, Talon of Everblight

Annyssa is one of Legion's best characters. She has a few things going for her. First of all, she does what you buy her for and does it well. She can shoot and back up all day long, harassing the flanks and circling around to get at rear support pieces. Second, she's relavent all game. She transitions from shooting up infantry to smacking preyed warcasters very nicely. And third, she makes the Raptors, already one of Legions best units, even better. Veteran Leader kind of sucks on Finn, but on a large base that the Raptors can see through most of two armies it's really solid.


Friday, 29 June 2012

Nephilim Bolt Thrower

The Bolt Thrower is a solid beast. At six points it's at the high end for what you pay for a light, but is solid enough in its specialised role of denting large targets and picking off solos and officers that it still sees play . If I'm running beast light I'll often throw one in as extra fury and to keep my opponent honest at range. I don't ever take two except with Epic Lylyth, and even then that will probably change once the Naga comes out.


Friday, 18 November 2011

War Chiefs

I've been enjoying the War Chief with my Warmongers a lot. He's not super awesome but he's decent at 3 points. With a medium base Veteran Leader is actually a useful ability, since you can actually see through small bases to see it. I pretty much never run two of them. The only reason I have two is becuase they were so crazy good in MKI. But if I was painting one I might as well do the other.


Tuesday, 31 May 2011

Storm Gunners

These guys were nice to finish off. With them done the Stormblades are at last complete. They lack the Cygnus that the regular Stormblades have so I painted the quater panel on the shoulders for colour. This also helped to set them apart as the special weapon troopers they are. This not only makes them more characterful, but is actually pretty helpful when keeping track of everybody on the battlefield.


Tuesday, 23 March 2010

Cygnar vs Retribution: The Revenge of Vyros

Nemo vs Vyros - Kill Box, 35 Points

Things have been busy with Spring Break and the kids, not to mention painting and playing games, but we've finally gotten around to writting up another report. I decided to take a jack heavy Nemo list while Myantek is sticking to her Dawngaurd army.

Army Lists

Cygnar

Commander Adept Nemo
Squire
Thunderhead
Ol'Rowdy
Lancer
10 Stormguard
Journeyman Warcaster


Retribution of Scyrah

Dawnlord Vyros
Manticore
Griffon
Dawngaurd Invictors
Invictor Officer & Standard
Dawngaurd Sentinels
Sentinel Officer & Standard
Arcanist
House Shyeel Magister

Scenario

Killbox

Mark a 24˝ square centered on the table parallel to the board edges. This is the kill box.Victory ConditionsAt the end of each player’s own turn, starting on the first player’s second turn, a player loses the match if he ends his own turn with any friendly warcaster or warlock not within the kill box.If time runs out before a player has won the match via scenario or assassination victory, break the tie using only the assassination and secondary tiebreaker rules outlined in “Victory & Tiebreakers.” For the secondary tiebreaker, count only the army points’ worth of models within the kill box

Setup

I set up my Cygnar first. Working from left to right, I put the Lancer on my left flank with Rowdy beside him. Junior stood behind them. The Stormguard formed a line in the centre with Nemo and the Squire behind them. The Thunderhead held the right flank.

Opposite them from left to right were the Sentinels + Unit Attachment with the Magister beside them. The Griffon and Vyros held the centre but were back a bit. In front were the Invictors + UA with the Manticore opposite the Thunderhead.

Turn 1

Cygnar

The Lancer and Thunderhead are assigned one focus. The Stormgaurd run, while the Journeyman advances behind them and casts Arcane Shield on them. Rowdy runs forward for free. The lancer and Thunderhead both run forward while the Squire advances. Nemo advances into the Kill Box and cast Deflection and then Electrify on the Thunderhead.

Retribution

The Invictors run into position. Vyros casts Mobility, advances and then casts Inviolable Resolve on the Invictors while the Griffin advances alongside him. The Arcanist advances and gives the Manticore a focus point with Power Booster. The Manticore then runs forward in front of the trees. The Sentinels run forward with the Magister behind them.

Turn 2

Cygnar
Nemo puts 5 focus on the Thunderhead after grabbing a point from the Squire, and then upkeeps electrify. The Stormguard advance followed by the Journeyman who recasts Arcane Shield on them to give Nemo a power token. The Lancer and Squire both advance with the Lancer putting itself in cover, followed by Nemo who advances and casts Chain Lightning through the Lancer into the Invictors. Their armour is up to the task and it does nothing. The Thunderhead then advances and unloads on the Manticore, but bad damage rolls result in only 8 damage to its power field.
Retribution
Vyros puts 3 focus on the Manticore and upkeeps Inviolable Resolve. The Arcanist activates first,advances to the Manticore, and gives it Conetrated Power. The Invictors advance and use their mini-feat Extended Fire to get +4 range. They have a mediocre round putting only three damage on the Lancer and killing just two Stormguard. The Sentinels, Magister, Vyros, and the Griffin all advance. The Manticore spends a focus to give itself +3 STR and then charges the Thunderhead. It combo-strikes the Thunderhead for 12 damage. Electrify goes off and pushes the Manticore back 2 inches, although the POW 14 hit does nothing. The Thunderhead loses no systems.

Turn 3

Cygnar

Nemo puts 4 focus on the Thunderhead and takes one from the Squire. The turn starts with Nemo activating and casting Disruption Field on the Thunderhead, before following up with another Chain Lightning on the Invictors. Like last time the Lightning bounces off. The Thunderhead does better, moving up and pounding the Manticore into the ground with two focus left over. The Stormguard charge and run, killing an Invictor, with Ol' Rowdy running into position behind them. The Journeymen casts Arcane Shield again.
Retribution

Vyros put 1 focus on the Griffon and upkeeps Inviolable Resolve. The Invictors advance, fail to kill the Stromguard tying them up in melee, do 3 more points to the Lancer, and manage to kill another Stormguard with their shooting. Vyros casts Mobility and charges the Arcanist, cleaving him in half. The Griffon runs to engage the Thunderhead while the Magister runs to the centre. The Sentinels advance around some more, still keeping out of charge range of the Stormguard.

Turn 4

Cygnar

Nemo puts 5 focus on the Thunderhead and grabs the last one from the Squire. The Thunderhead then walks out of combat with the Griffon, takes 2 points of damage from the free strike, and then starts shooting. At the end the Griffon is still there, although its Right Arm and Movement are both crippled. Nemo sends yet another Chain Lightning through the Lancer at the Invictors. Even with boosting damage and getting 7 hits he only kills one.The Stormguard charge and kill two more Invictors. Ol' Rowdy runs. the Journeyman casts Arcane Shield once again on the closest Stormguard. The Squire and Lancer advance.

Retribution

Vyros upkeeps Inviolable Resolve. The Invictors retaliate, killing 2 Stormgaurd and doing 6 more points to the Lancer. The Sentinels edge forward a bit more, content to let the Invictors handle things. The Magister casts at the Lancer and does no damage, but is able to push it back 2 inches. The Griffon advances into melee range of the Thunderhead and does nothing. Vyros casts Mobility, charges the Thunderhead, and destroys it single handedly.

Turn 5

Cygnar

Nemo puts 5 focus on Ol' Rowdy. Nemo aims and shoots Vyros for 2 points of damage, then Locomotions Rowdy 3 inches. Rowdy charges Vyros but is 1/4 inch short to get into engagement range, and so his activation ends (ouch). The Lancer advances and kills an Invictor. The Stormguard retreat back. The Journeyman advances up to cast Arcane Shield on Ol' Rowdy to try and help him weather the oncoming storm.

Retribution

Vyros upkeeps Inviolable Resolve. Vyros wrecks Ol'Rowdy with solid damage rolls. The Griffon advances to screen Vyros. The Magister misses the Lancer while the Invictors kill a Stormguard. The Sentinels sense their moment and run.

Turn 6

Cygnar
Nemo moves and shoots at Vyros through the doorway, but the shot misses. He then hits Vyros with a Chain Lightning spell that bounces off the Dawnlords armour. His second Chain Lightening misses. The Journeyman shows his mettle by advancing and shooting Vyros, reducing him to 6 points of life. The Stormguard charge and wreck the Griffon. The Lancer is less effective and does nothing except tie up Invictors. The Squire advances and blocks the door.

Retribution

Vyros upkeeps Inviolable Resolve. Vyros casts Mobility, advances, and destroys the Lancer. The Invictors advance and kill a Stormguard. The Sentinels charge and kill 2 Stormguard, at which point the final survivor fails his CMD check. The Magister advances and does 3 points of damage to the Squire, dragging it 3 inches forward.

Turn 7

Cygnar

Nemo advances up the stairs, shoots at Vyros again, and again misses. He casts Chain Lightning twice but doesn't even kill anyone as it bounces off their ARM. The Journeyman makes the unwise decision to kill a Sentinel.

Retribution

The Sentinels kill the Journeyman while the Magister casts and misses Nemo. The Invictors advance. Vyros casts Mobility, charges Nemo, and one shots him.

Afterward

Defenstrator

Well that was kind of brutal. I was doing ok there for awhile. The Stormguard were stymying both the Invictors and the Sentinels and the Thunderhead was doing ok. But then I made my first big mistake in not moving the Thunderhead back far enough when shooting the Griffon. I was paranoid of giving it cover from the Thunderhead when I should have been paranoid of what Vyros could do to it. My second mistake was trying to charge Vyros with Ol' Rowdy instead of just destroying the Griffon. With the Flank bonus gone Rowdy probably would have survived Vyros beating on him. It also didn't help that I just couldn't roll above a 7 for damage with my Chain Lightnings. I figured I could cut down the Invictors with just the shear volume of fire, but with Inviolable Resolve on them that just wasn't happening. I should have recognised that as well.

Myantek

The rest of my army did a little better this time but, again, Vyros was the go to guy to get things done. He does have other spells in his list... I just haven't managed to figure out a use for anything but Invioable Resolve and Mobility. I think I have to do a bit of experimenting. On the other hand, I finally won a game! Yay!
I don't know if the Magistar really fits with this army. I'm thinking of dropping him and maybe adding in one of the Eirysses, maybe a Soulless or two. I've actually been playing at 33 points because of what I've got built but I don't think it's been making that much difference. I've got a little room to play.

Wednesday, 30 December 2009

Sword Knights and Unit Attachment

December has been pretty busy with all the usual holiday stuff. I did manage to finally finish my Swordknights and the UA though. I've been working on this unit off and on for about three months so it's nice to get them out of my hair at last.


Sunday, 8 November 2009

Siege vs Kaelyssa

Cygnar vs Retribution of Scyrah - 35 points.

Myantek and I played a straight caster kill game. I tried out Siege again with a slightly modified list, while she loaded up on jacks to bulk out her army.
Cygnar
Major Markus "Siege" Brisbane
Squire
Reinholdt
Defender
Black 13th Gun Mage Strike Team
Trenchers (Minimum)
3xGrenediers Weapon Attachment
Officer and Sniper Unit Attachment
Trencher Cannon Crew (Chain Gun Proxie)
2xStromsmiths (Stormguard Proxie)
Captian Maxwell Finn (Journeyman Proxie)

Retribution of Scyrah

Kaelyssa, Night's Whisper
Phoenix
Manticore
Griffon
Chimera
Dawnguard Invictors
Dawnguard Invictor Officer and Standard Unit Attachment
Souless Escort Weapon Attachment
Arcanist

Setup
The game was caster kill. On eah side was a small hill, with a forest in opposite corners and rough terrain and a building in the centre. Myantek set up first and put the Phoenix on the left flank with Kaelyssa central and the Chimera, Manticore and Griffon on the right. The Invictors were behind the Griffon while the Arcansit supported the Manticore

I set up with a Stromsmith and the Defender facing off against the Phoenix, Siege/Reinholdt/Squire centre right, and then the Black 13th and other Stormsmith. The Trenchers, Trencher Cannons, and Finn were advance deployed in front of them.

Turn 1
Retribution

The Griffon and Chimera are assigned 1 focus each. The Phoenix advances forward while the Griffon and Chimera run to the centre building. Kaeylssa casts Phantom Hunter on the Manticore and advances. The Manticore and Arcanist advance as well while the Invictors run into position on the hill.
Cygnar
The Defender is assigned 1 focus. Trencher Cannon #2 shoots at the Invictors but is just short and the deviation hits nothing. Trencher Cannon #1 shoots through an opening in the building at the Chimera but also does nothing. The Defender advances but is still shot is still short of the Phoenix. The Trenchers Cautiously Advance while the B13th run up behind them. Bothe the Stormsmiths adavnce forward, with Stormsmith #2 moving inot the forest template. Finn moves in ahead of him. Siege them goes and advances, puts Foxhole on the B13th, and manages to shoot the Chimera, only doing a point of damage. Reinholdt and the Squire move up behind him.


Turn 2
Retribution
The Chimera Apparates around the corner of the building. Kaelysaa upkeeps Phantom Hunter and assigns 2 focus to the Manticore and 1 to the Phoenix. The Phoenix advances and shoots Stormsmith #1. The Invictors begin by using their mini-feat to gain 4" of range. They then advance and kill one of the crew members of Trencher Cannon #2 and 2 Trenchers. The Manticore advances as well and with a bit of luck manages to kill 3 Trenchers with unboosted shots. Kaelyssa arcs an Arcantrik Bolt at the Trenchers through the Chimera in order to try and force a CMD check, but it misses due to them being Dug In. She then feats with the Vanishing, meaning that models in her CTRL area have Stealth and cannot be charged. The Chimera then retreated to safety behind the building while the Griffon advanced to screen the Invictors.
Cygnar
The Defender recieves 2 focus and Siege pulls 1 focus off the Squire. Finn advances and guns down two Invictors which are out of range of Stealth. Trencher Cannon #2 kills another non-Stealthed Invictor. Reinholdt reloads so that Siege can shoot twice this turn. Siege casts Mage Sight and shoots twice at the Manticore. The first shot misses while the second does 8 points to its generator field. The Defender follows up with a boosted shot at the Manticore which destroys its generator. The B13th are trapped behind the Trenchers and can't get close enough to get a shot at the Manticore, so the Trenchers throw Smoke to block LOS. Stormsmith #2 Disrupts the Manticore while Trencher Cannon #1 shoots, but with Stealth the shot misses and the AOE scatters to hit nothing.


Turn 3
Retribution
Kaelyssa upkeeps Phantom Hunter and assigns 1 focus to the Phoenix. The Chimera Apparates back around the corner again. The Arcanist advances and fixes 5 points of damage on the Manticore putting the field generator back on line. The Manticore aims, shoots, and kills Stormsmith #2. The rear Invictors move up and then the unit shoots at Finn, who makes three tough rolls but then fails his fourth and dies. The Phoenix runs to engage the Defender but is not engaged himself due to reach. Kaelyssa then arcs Arcantrick Bolt through the Phoenix and makes the Defender Stationary after doing 6 points of damage. The Griffon moves up beside the Chimera.
Cygnar

Siege pulls a focus from the Squire and then assigns 3 focus to the Defender, which then spends one to shake off Stationary. Reinholdt lets Siege shoot twice. Siege feats with Breach which halves a targets ARM on its first hit, casts Explosivo on himself, and vaporises the Manticore. The Explosive 3"AOE kills the Arcanist and 1 Invictor. Siege's second shot does 8 points to the Griffon, although 6 points of that are just the generator field. Trencher Cannon #1 shoots the Chimera and does 13 points to it. The Trenchers then Assault the Chimera and Griffon. Their attacks overwhelm the Chimera and scrap it but the Griffon hangs tough behind its ARM 18. The B13th advance and Ryan kills 4 Invictos with her 4" template. The other two B13 manage to pick off the Invictors officer. The Invictors test against CMD for caualties and pass. Trencher Cannon #2 misses the Invictors and its AOE bounces off since they are out of Siege's CTRL area. The Defender pounds on the Phoenix and manages to cripple its open fist.


Turn 4

Retribution

Phoenix is assigned 3 focus and regenerates 6 points of its power field. Kaelyssa moves to the building, gets line of sight through the gap, and Arcantrick Bolts the Defender for 6 more points. The Phoenix hammers the Stationary Defender but doesn't manage to cripple any systems. The Griffon manages to kill the Trencher Sniper. while the Invictors aim and pick off Ryan and Watts.

Cygnar
Siege pulls a focus from the Squire and then assigns 3 focus to the Defender, which then spends 1 focus to shake off Stationary. The Defender keeps pounding on the Phoenix but only manages to cripple its cortex due to the shock hammer. Trencher Cannon #2 manages to kill an Invictor. While Lynch, the remaining B13th member, picks off another Invictor. Trencher Cannon #1 tries to hit Kaelyssa but unsurprisingly misses. Reinholdt lets Siege shoot twice. Siege then Ground Pounders Kaelyssa for 8 points and then shoots into combat to pick of the Phoenix. The Squire stands in front of Siege. The Trenchers all bounce off the Griffon.
Turn 5

Retribution
Kaelyssa casts Phantom Hunter on herself and advances into the open. She shoots Siege for 8 points of damage. The Invictors miss the last Black 13th member while the Griffon impales another Trencher.

Cygnar
Siege assigns 3 focus to the Defender. Reinholdt lets him shoot twice. Siege aims but his first shot misses and his second only does 4 damage. Trencher Cannon #1 misses and the AOE hits nothing. The Defender walks over and misses its boosted attack, buys another one and hits with its second boosted attack, killing Kaelyssa.

Afterward

Defenstrator

Well I did alot better than game than I did against Indy, but then again I didn't have to deal with Mage Hunters either. I also kept Siege back more this game which let his shooting come more into play. I have to say that Reinholdt + Siege seems kind of wrong. It's one thing to get even another hand cannon shot. A range 14" POW 14 after Ground Pounder just seems like insult on top of injury. He did a huge amount of damage to Myantek's army by himself.

The Trencher Cannons yet again did almost nothing. The first one got the one good hit on the Chimera while the other killed 2 Invictors. Not a 6 point return in my opinion.

The B13th gutted the Invictors but their DEF 15 wasn't enough to save them from return fire. I had planned to use Trencher smoke to have their Prowl give them Stealth, but the Trenchers were all occupied. In the past I have used Gorman as a dedicated smoke provider and I think I may again in the future.

The Trenchers were alright vs lower ARM but that ARM 18 Griffon proved too much for them. Again they seemed a bit too expensive considering how much they added to the fight.


Myantek

Too many Myrmidons. It's all I have together for the moment (and still so the next game is more punishment for slacking on building) so I made due. Unfortunately there were too many times were I felt hamstrung by lack of Focus; either on Kaelyssa or on the 'jacks.

The Phoenix is truely an awesome Myrmidon. This was my first opportunity to field it and I don't think it'll be the last. I don't know if it's really the best 'jack for Kaelyssa's force as I've really enjoyed the shooting from the Manticore. I certainly don't need a Chimera and a Phoenix in the same army. So for the 'jack I'm least impressed with is the Griffon. I'm still looking for how to use it.

The Arcanist and the Invictors didn't disappoint but I'm not sure about the Souless Escort. I don't think the Invictors are the best unit to attach him to, especially considering Defenstrator's lack of offensive magic. Once I get the Sentinals built I think the Souless will get more use.

All in all, I think this battle was closer than it looked. The only thing that was really doing damage was Siege. It had turned into a grindhouse and I was slowly being ground down.

Thursday, 6 August 2009

Krueger vs Saeryn, Break the Line

Krueger vs Saeryn, 500 points

Armies

Circle:

Krueger the Stormwrath
Woldwarden
Woldwarden
Woldwryd
Shifting Stones
Shifting Stones
6 Druids of Orboros
Wayfarer


Legion:

Saeryn, Omen of Everblight
Angelius
Seraph
Seraph
5 Raptors
Forsaken
Swamp Gobbers


Scenario

We played Break the Line from the Steamroller 4 rules. Basically it's a control the board scenario. A player wins by controlling 2 zones on his or her side of the table and one zone on the opponent's side.

Set Up

I won the roll and elected to go first. Krueger got placed close to the centre of the table by some trees. The Woldwyrd settled in slightly behind him with a Woldwardan on the far edge of either side of his control area. The Druids hid behind the hill on the far left of the table and the Waywafer took up a position on the far right. When the advanced deployment phase came the Shifting Stones were placed in front of each of the Woldwardens.

Defenstrator set Saeryn up directly opposite Krueger with the Angelius in front of her. The Swamp Gobbers settled in behind her while both Seraphs were placed by the hill on the left of the board with a Forsaken to follow them. On the far right of the table the unit of Raptors were placed behind the ruins.

Circle Turn 1

Woldwarden 1 moved forward into Shifting Stones 1 and put up Undergrowth with the second Woldwarden doing exactly the same thing on the other side of the board.

Krueger cast Skyborne and Wind Storm before moving in front of the trees. The Woldwyrd followed him and was riled for 1 Fury.

The Wayfarer moved up beside Woldwarden 2 and the Druids ran to Woldwarden 1.


Legion Turn 1

The Raptors moved forward onto the hill near the mid-line of the board.

Saeryn cast Respawn on the Angelius and moved forward. The Angelius ran to the ruins.

The Seraphs moved onto the hill and riled for 3 and 2 Fury respectively and the Forsaken moved up to remove the Fury from Serpah 1.

The Swamp Gobbers moved up behind Saeryn and let off a smoke cloud that concealed Saeryn and only touched the Angelius.


Circle Turn 2

So far things were going OK for me. It's pretty much what I expected when battling Defenstrator. I knew I wasn't going to win based on scenario because I couldn't hold a zone on my side from the Raptors so I had to make him hurt this turn. I came up with a plan, started to put it into effect and then screwed up. I finished my turn looked at the table and thought, "Guess this will be a short battle report." Anyway...

The Woldwyrd moved up beside Woldwarden 1 and cast Arkane Killer on it. Krueger cast Skyborne and moved in front of the Woldwyrd and cast Lightning Tendrils on Woldwarden 1. He then cast Windstorm again and let loose his feat. It missed Saeryn, did 2 points to Seraph 2 and 1 point to the Angelius.

The Shifting Stones teleported Woldwarden 2 to the ruins. It attempted to cast lightning at the Seraphs but was just sort. Instead it riled for 1 point and cast Undergrowth. The Druids ran from the Raptors into the trees and the second set of Stones teleported Woldwarden 1 into the ruins.

The Woldwarden then started pounding on the Angelius. The first blow did 12 points! The second blow... missed. Damn. I was hoping for the chain attack to send the Angelius flying. I guess I might as well kill it. Two more hits and the Angelius went down. Only to Respawn 3 inches away. Staring directly at Krueger and liking its lips.

Legion Turn 2

Serpah 1 frenzied! It attacked its buddy and did 15 points taking out Seraph 2's Spirit and Mind! Defenstrator complained about Krueger's feat.

Saeryn moved into the ruins and cast Breath Stealer at Krueger and missed. Defenstrator complained about Krueger's Sky Borne. She then took out her knives and threw them at my warlock doing 2 points of damage.

The Angelius moved in on Krueger and boosted its hit roll. It hits, boosts damage, and Krueger dies. In one blow. Even if Saeryn hadn't hit him. Defenstrator said it had an equal chance of missing. I'm not so sure on that.


Afterword

Myantek

Sigh.

So there are a bunch of things I could have done that I only realised once I finished my turn and shook my head in shame. Placing storm templates in the Angelius' way so it wouldn't be so easy to get to Krueger. Making the other Woldwarden go second and trying to Chain Lightning the Respawned Angelius. I only had to do three points. I might have at least forced Saeyrn to spend some Fury to heal it. I could have moved the Stones and had the Woldwarden trample over to block Krueger. I could've listened to Defenstrator explain Respawn and realise that when I killed the Angelius it was going to come back, away from the Woldwarden and be able to do something.

I still had another turn before Defenstrator was going to be able to win by scenario. I could've made better use of it.

Defenstrator

To be fair, I really did only have an even chance of hitting Krueger. With Sky Borne he is effectively DEF 17, so the Angelius needed an eleven on 3d6. To be honest I was on pins and needles that last turn. One Seraph was useless, the other half dead, meaning Saeryn and Angelius were the only things that could get him. When Saeryn flubbed Breathstealer and damage roll for the knives I thought the game was up. Luckily for me the dice broke my way and Kruger ended up impaled. If I had rolled a ten or less it would have been Saeryn's turn to be standing in the open waiting for death. So I felt this one was tighter than it looked.

Wednesday, 1 April 2009

Epic Thagrosh vs Epic Kaya- Contested Ground

Legion vs Circle -750 Points


Myantek had only played epic Kaya a few times so this seemed the perfect match up for my second game with epic Thagrosh. I took the exact same army as my previous game.

Legion


Thagrosh, the Messiah
Angelius
Angelius
Seraph
Seraph
Harrier
Harrier
Forsaken
Forsaken
Deacon + 4 Riders
Swamp Gobbers Bellows Crew

Circle

Kaya the Moonhunter + Laris
Warpwolf
Pureblood Warpwolf
Wold Wyrd
Argus
Huntress + 9 Bloodtrackers
Huntsman + 9 Wolves
Wolves of Oboros Officer and Totem Bearer
Blackclad Wayfarer
Sentry Stone & Mannikins
Shifting Stones
Swamp Gobbers Bellows Crew

Scenario

The scenario was Contested Ground. Divide the battlefield between deployment zones into four 12" wide Territories running north to south. A player controls a Territory if he has one or more models completely within the Territory and his oppononet has no models completely within the Territory. For a unit to control a Territory all models in the unit still in play must be completely within the Territory. A warrior model must have a CMD greater than 1 to control a Territory. Ignore wrecked or inert warjacks, wild warbeasts, and fleeing models when checking for control. A player scores one Control Point for each Terrirtory he controls at the end of each of his turns. Players cannot score Control Points during the first round of the game.

Set Up

I won the role and chose to go first. My set up from left to right wasRaptors, Harrier 1, Seraph 1 with Forsaken 1 behind it, Angelius 1, and Epic Thagrosh with the Swamp Gobbers just over 3 inches behind him. Next behind the forest were Seraph 2, Harrier 2 and Forsaken 2, with Angelius 2 on the far right.

Opposite me from left to right were the Blackclad and Warpwolf, epic Kaya and Laris in the centre, and then the Wold Wyrd, Argus, and Pureblood, with the Wolves on the far right. I had no advance deploy units so Myantek then placed her Sentry Stones about a third of the way in from each side of the board, her Shifting Stones in front of the Warpwolf, and the Bloddtrackers inside the woods. The Bloodtrackers choose Angelius 1 as their Prey.


Turn 1

Legion


Angelius 1 starts the turn simply by running forward. Thagrosh activates next and casts Unnatural Aggression on Angelius 1 and Slipstream. He walks forward, Slipstreams Seraph 2, and castsDragon's Blood on Angelius 2. Angelius 1 moves to put pressure on the Bloodtrackers and runs to the rock in front of them with Harrier 1 also moving there to help screen it. Seraph 1 runs up behind them to help with the counter attack and the Raptors move up beside them, unable to shoot due to the Bloodtrackers Stealth. Forsaken 1 advances and grabs the fury off of Seraph 1. Seraph 2 now Slipstreams and advances through the forest, dragging Thagrosh forward another 2 inches. Harrier 2 riles and runs, meaning I am now running hot but I expect ot loose fury to the Sentry Stones. Forsaken 2 runs after Harrier 2 while the Swamp Gobbers advance and put smoke on Thagrsoh, who is also partially in the trees, and Seraph 2.

Circle

The Sentry Stones begin the turn. Sentry Stone 1 steals a fury from Angelius 1. Its Manniken then attacks Angelius 1 with a boosted attack and Roots it. The same happens for Sentry Stone 2 on Angelius 2.The Wolves of Oboros run up the right flank while on the left flank the Blackclad advances and casts Wilding at the Raptor leader, but misses. The Warpwolf takes +2 ARM and runs into the centre of the Shifting Stones, which then activate and teleport it into the woods behind the Bloodtrackers. The Wold Wyrd then activates and puts Arcane Killer on the Argus before riling and advancing. The Argus walks up beside the Wold Wyrd and the Pureblood moves up behind the Argus. Kaya now activates. She advances, puts Forced Evolution on the Argus and casts Mistwalker. Laris moves up beside her and riles. The Bloodtrackers feel unsupported and decide to retreat deeper into the woods while the Swamp Gobbers put smoke on Kaya and Laris.

Turn 2


Legion

Thagrosh leeches everything and recieves a free fury from the Anthanc to make him full and both Dragon's Blood and Unnatural Aggression are upkeptHe then starts the turn by casting Slipstream and Glory of Everblight before advancing through the trees and Slipstreaming Seraph 2. Angelius 2 advances, Thrusts and boosts damage on Sentry Stone 2 to kill it, and retreats 3 inches via Ravenous. Angelius 1 does the same to Sentry Stone 1. Seraph 2 then advances to a rock in front of Angelius 2 and unloads on the Wold Wyrd and Argus. I don't assign quite enough shots to the Wold Wyrd and it ends up surviving with 2 points left on its Spirit. The Argus takes 6 points of damage.The Raptors charge the Shifting Stones, wounding one and destroying another, before moving back out of the way. Seraph 1 casts Slipstream, drags Harrier 1 up, and shhots at the Bloodtrackers, killing the front 2. Harrier 1 then casts True Strike and charges out of Thagrosh's control area into the Blackclad, killing him. Forsaken 1 just moves up behind the group, bit not too close because of the Raptors, while over on the far right Harrier one runs a bit while Forskaen 2 advances and grabs the fury off it. The Swamp Gobbers then edge forward some more to put the cloud on Thagrosh. I recieve a point at the end of my turn for the Harrier ontroling the far left Territory.

Circle


Kaya leeches for full and upkeeps Forced Evolution. The Wolves of Oboros start the turn out strong by popping their mini-feat Wild Hunt and charging Seraph 2, quickly killing it. Laris runs to the right while Kaya advances and casts Muzzle at Angelius 2, missing it. She then uses her feat Call of the Hunt and teleports to Laris. The Wold Wyrd casts Arcane killer on the Argus again before teleporting off behind Kaya. The Argus then charges Angelius 2 but the rolls don't come through and he only does 6 points of damage to the currently ARM 19 beast before teleporting to Kaya. The Pureblood Warpwolf then teleports in fornt of Kaya followed by the regular Wapr Wolf who takes +2 ARM and stands beside her. The Bloodtrckers then ambuscade Serpah 1, hurting it badly and destroying its mind, while the Shifting Stones position themselves to block Harrier. The Swamp Gobbers advance forward. Things are definately heating up. While the Warpwolves didn't do anything Myantek now has most of her army near Thagrosh while he is relatively alone.

Turn 3

Legion

Thagrosh leeches for full and upkeeps Dragon's Blood. Harrier 1 frenzies and does 2 points to a nearby Sentry Stone. Thagrosh heals Seraph 1 for a point, casts Slipstream and Glory of Everblight, and uses his feat Dragon Storm (coolest feat name ever). He then advances, moving Angelius 2 forward, and sprays Blight Fire over the Wolves and Pureblood. Unfortunately they were on a hill so only one Wolf was killed, but the Pureblood was hit taking six points of damage and was set on fire. Angelius 2 then charges the Pureblood and does 31 points of damage on its Thrust attack. The Pureblood spends a fury to transfer the damage to the Warpwolf. I had totally forgotten they could do that and get the feeling I am now in big trouble. The Angelius continues attacking and manages to do six more points to the Pureblood. Harrier 2 then casts True Strike, charges, and kills a Wolf thereby breaking their unit coherencey, while Forsaken 2 advances behind.

On the left side of the board the Raptors chrage the Bloodtrackers, killing 3 of them before retreating back out of the way. Seraph 1 then moves up and attacks, but even with Glory of Everblight fails to hit. Angelius 1 then moves up and pegs off the Bloodtracker Huntress, which causes them to run. The Swamp Gobbers then move into the trees and put a cloud on Thagrosh while Forsaken 1 runs right. With all the activations done Dragon Storm takes effect. Angelius 2 manages to put another 5 points on the Pureblood, but when Harrier 2 moves and attacks it as well fails to hit. Angelius 1 and Seraph 1 both move over to support Thagrosh and miss with their shooting attacks. I get a second point for holding the inner left Territory with Seraph 1.

Circle

Kaya drops Forced Evolution and leeches to full. The Bloodtrackers run through the woods but manage to rally, contesting both of the left hand Territories. To add to that the fire goes out on the Pureblood and Myantek is all set to counter attack. The Wolves in formation charge Harrier 2, but don't manage to kill it. It is left at one wound with no Mind or Spirit. The rest of the Wolves move to form coherency and one dies to a free strike as they move. The Argus runds forward while the Wold Wyrd puts Arcane Killer on the Pureblood. The Pureblood then spends a fury on Ferocity (re-roll missed melee attacks) and uses its 3 initial attacks and 5 fury to keep buying attacks on Angelius 1 until it dies a squishy death. Hemmed in by Harrier 2 Laris attacks it, but misses. Kaya heals the Warpwolf for 2 points and casts Mistwalker. The Warpwolf then regenerates a further point and the turn ends with the Swamp Gobbers moving over to put a smoke cloud on Kaya, Laris, and the Warpwolves.

Turn 4

Legion

Thagrosh leeches. Harrier 1 frenzies and destroys a Shifting Stone. Harrier 1 still has a fury but passes Threshold. The Raptors move forward and shoot at the Bloodtrackers, killing one. They then use their second move to engage them. Forsaken 2 now charges the single Wolf of Oboros engaging Thagrosh. It spends a fury point to boost the hit, but still misses. Now I have a problem. Forsaken 1 runs to the far right to contest the zone. I then do some precise measuring and find that Thagrosh can stay the same distance away from the Wolf but circle around him towards the Pureblood. Thagrosh's base size plus reach is enough to engage the Pureblood so Thagrosh casts Glory of Everblight and kills it, using his second attack to kill another Wolf.

Seraph 1 Slipstreams Angelius 1 and shoots up the Argus for 10 points, destroying its Body. Angelius 1 now charges the Warpwolf, killing it with a single Thrust attack, from which Kaya reaves the fury. The Angelius uses its Ravenous move to reach Kaya and whacks her for 9 points of damage. Harrier 2 moves to Kaya, casts True Strike, and does 3 more points to Kaya. Lastly the Swamp Gobber edge forward some more and put the 5 inch swamp cloud down over Thagrosh. I get no points because the Bloodtrackers are contesting both the left side zones.

Circle

It's do or die time for Kaya and she leeches herself full. The Wolves seize their moment and charge Thagrosh. The first CMA whacks him for 12 points, at which point I forget that Thagrosh can make a lesser beast. But I get lucky and the second CMA misses while the third only does 3 more points of damage. Laris activates next and takes 12 points from a free strike when walking away from the Angelius. Kaya then teleports to Laris and begins to pound away on Thagrosh, but can only reduce him to 1 wound. As the last thing in range to attack the Argus seizes its moment. Unfortunately it misses its first attack and the second one bounces due its lack of Body.

Turn 5

Legion

Thagrosh leeches for full. He is standing next to a Kaya who has no fury and there is a Harrier within his control area. Kaya explodes in an Erruption of Ash.

Afterword

Defenstrator

Tight game. I felt Myantek did a good job denying me scenario points while massing her force by my warlock. A better run of luck and the game would have been hers. This match Hubris turned out to be a much larger factor. Trapped by the Wolf it was impossible for Thagrosh to escape. All I could do was kill the largest threats and brace for the coming attack. I found the spells to be about as useful as my last match. Glory of Everblight was dead solid. It didn't give me super high rolls this game but I didn't suffer any runs of bad luck with my beasts. Dragon's Blood was solid for pushing the Angelius to ARM 19. Unnatural Aggerssion on the other hand didn't do anything because Myantek just chose to withdraw and then attack something else instead. And neither of the direct damage spells were even cast.

Thagrosh himself seems to be cementing a reputation of being mad, bad, and dangerous to know. He is not a warlock your opponent can expect to survive if they end their activation too near to him, and that engenders a certain healthy repsect in your opponent. They want to get close, but they worry about moving too close and getting insta-gibbed. The rest of the army seems to be working alright, but I could definately see trading a Harrier for a Shredder. The lack of defensive spells and animi is pretty nerve wracking at times. Aside from that it seems to be working alright, although I worry about fighting lists that have a larger ranged complement.

Myantek

One more point. If Defenstrator had remembered to pop Shredders as Thagrosh got hurt I don't really think it would have changed my strategy that much. I might have saved up a Fury to heal the Argus and maybe he might have done a little damage. As it was I really didn't have the choice. It was a do or die turn. I either killed Thagrosh and won or tried to hold him off a turn and lost to scenario when the Raptors killed the Bloodtrackers to get those two zones they were contesting. Killing the Swamp Gobbers would have given him the last point he needed.

I wish I'd had a War Wolf rather than the Swamp Gobbers. When I made the army I had exactly 15 points left so I threw the Gobbers in there for completeness. The War Wolf would have been more useful (if I owned one anyway). I would have had to drop a Wolf, but I've got 12 of them.

I'm still working on balancing aggression. I think I could have done more with the Bloodtrackers. It was only my second time playing with them and I haven't really figured out their tactics quite right. Same with the Blackclad. It was the first time I played with him. I almost teleported him right to one of the Forsaken but decided to wait a turn as Defenstrator turned his attention to destroying the Bloodtrackers. Then he was dead and I'd missed my chance.