Legion vs Circle 500/750 pointsSo first we played this scenario with
epic Kaya and epic Thagrosh then we decided to try it with different warlocks. Circle's only other choice is Morvahna so that became
Morvahna vs Absylonia. I won the first game, Defenstrator won the second. The first game was satisfying; the second game was... not. That led us to try
one more time to have a go at this scenario. Really, a two turn game with new warlocks on each side tells us nothing. This makes it best out of three.
Background and Special RulesReally? I have to write them out again. I think you can follow the link above if you need the details. Basically, it's the chase out of the Castle of the Keys from
Metamorphosis. Circle's in pursuit so they get an extra 250 points and advance deploy. Legion gets 150 points of beast reinforcements in Turn 3. Plus they get first turn.
ArmyLegion
Absylonia, Terror of Everblight
Typhon
Carnivean
Shredder
Shepherd
Vassal + 9 Archers
Legion Archer Officer + Ammo Porter attachment
Circle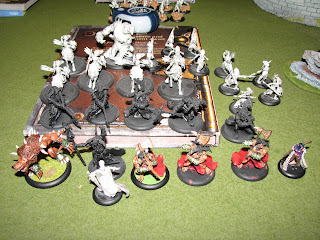
Morvahna the Autumblade
Warpwolf
Pureblood Warpwolf
Tharn Ravager White Mane
Tharn Ravager White Mane
Beast Lord + 5 Ravagers
Tharn Ravager Shaman attachment
Huntress + 9 Bloodtrackers
Huntress + 4 Wolf Riders
Lanyssa Ryssl, Nyss Sorceress
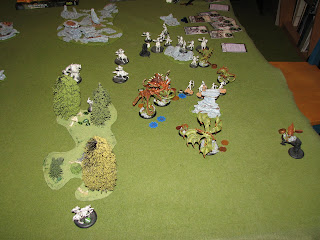
Set UpThe table was set up with three small rock formations along either side just at the edge of the deployment zones On the left of the board was a large rock formation and on the right was a stand of trees.
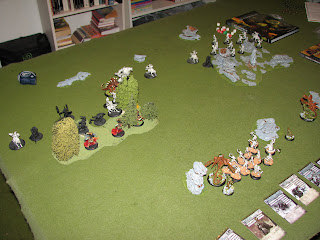
On the Legion side, from left to right were: Typhon, Shredder and Absylonia in the middle with Archers beside her and the Carnivean and Shepherd by the final clump on rocks.
Circle set up as far forward as possible with advanced deploy. A White Mane on the far left with the Bloodtrackers, the Pureblood and the Warpwolf with Morvahna and Lanyssa on the far right. Ravagers and the second White Mane were in the trees and Wolfriders spaced themselves out within the line of the army. The Ravagers then got to move ahead through the trees thanks to the Shaman. Wolfriders declared they were Hunting Archers and the Bloodtrackers took Absylonia as their Prey.
Legion Turn 1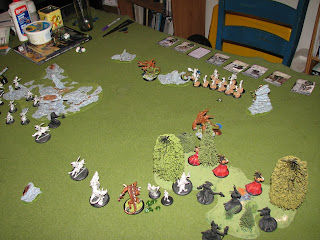
Absylonia began the turn by casting Playing God on the Carnivean, Spiny Growth on herself and then burning 2 Fury before moving forward.
The Carnivean gave itself Spiny Growth and charged the Ravagers. It used the spray assault but managed to miss both the Ravager and the Wolfrider Huntress.
Typhon gave itself Enhanced Healing and then inched forward. The Shredder moved to Absylonia the Archers stayed still and the Shepherd moved into the lee of the rock.
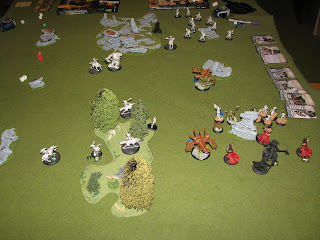
Circle Turn 1Circle began the Great Flank Aro

und. The Wolfriders (except the Huntress who stayed near Morvahna) all ran around the outskirts of the army with the Bloodtrackes on the left and the Ravagers on the right supported by the White Manes. After witnessing the spray of the Carnivean Morvahna moved back slightly and cast Regrowth on the Wolfriders and Revivify on the Ravagers.
Lanyssa moved into the forest and cast Winter Storm, removing Eyeless Sight, All Terrain and Wings from nearby blighted creatures. The Warpwolf moved out from behind the trees and riled for 2 points of Fury while warping to increase armour. The Pureblood moved with him and riled for 3 points of Fury.
Legion Turn 2Absylonia pulled the Fury off her beasts to replenish her full stash then chose to upkeep Playing God.

The Archers moved forward towards the Ravagers and aimed a Concentrated Volley at them managing to kill one of them and wound a second.
The Shredder went Rabid and charged one of the Wolfriders but missed. The Shepherd tried to hit a Wolfrider but missed as well.
The Carnivean walked menacingly toward the Ravagers and started attacking them. While inflicting major wounds to two of the Ravagers the beast only managed to kill one of them. It ended its activation but giving itself Spiny Growth.
Absylonia pumped herself up by giving herself Glide, Barbed Hooks and Brutal Damage before charging , and killing, one of the Wolfriders. She then cast Tenacity on herself.
Typhon gave itself Enhanced Healing and moved toward Absylonia.
Circle Turn 2Whew. Turn 2 and Morvahna's still alive. Yay! She reaved full Fury off the beasts and then Regrew the slain Wolfrider. She also upkept Regrowth and Revivify.
The Ravagers that weren't tied up with the Carnivean charged the Archers and killed 7 of them. The one that was attacked by the Carnivean managed to damage the beast.
Lanyssa failed to cast Hunt on Absylonia so the two Wolfriders that were close enough to throw their javelins at the warlock only managed to do 3 points to her.
Morvahna advanced and cast Harvest. The Pureblood and the Warpwolf advanced to get into position to do something.
Legion Turn 3
Absylonia got full Fury but the Shredder had to test. It managed to pass Threshold and did not Frenzy. She upkept Playing God and the first of the reinforcements arrived. A Seraph and a Raek came on the board behind the Ravagers.
The Seraph moved into Abyslonia's control zone and shot a Ravager (getting 5 extra attacks), all those shots go to waste as it only kills one Ravager and wounds the Beast Lord. The Archers CRA into the Ravagers to kill a second Ravager this turn and wound the Beast Lord a little more. The Carnivean shuffled around the Ravager to wound the Shaman and finally killed the leader. The Raek charged a White Mane and did a little damage.
Typhon gave itself Enhanced Healing and moved in front of Absylonia to breath on Lanyssa, killing her. Absylonia cast Tenacity on the Shepherd and the Shredder and gave herself Spiny Growth.
Circle Turn 3Morvahna pulled in Fury and upkept Regrowth and Harvest, no sense keeping Revivify when most of the unit is dead.
The White Mane shuffled around to attack the Seraph but missed. The Ravager attacked the Carnivean, but missed. A Wolfrider charged the Shepherd and a second charged the Shredder and misse. Bit of a pattern with the Tharn this turn... The other White Mane simply ran to the rock.
The Pureblood moved closer to the Warpwolf and gave him Ferocity and Spurs. Morvahna moved into the trees and cast Wurmwood at Typhon, managing to damage it even if the beast healed itself. That just left the Warpwolf to charge Typhon. He hit with his first attack! He hit with his second attack! Throat Ripper tore into the beast! Some great regeneration rolls on Defenstrator's part left Typhon not dead at the end of the Warpwolf's assault. It still had 8 points left. At least it was knocked down.
Legion Turn 4Absylonia leached for full Fury but was forced to leave some on the Shredder, Raek and Typhon. Within the Shepherd's range the Shredder could be forced to Frenzy on the Ravager, but missed. The Raek passed its Threshold test. We then both forget that Typhon is knocked down, and it Frenzies on the Warpwolf, doing 4 points. The reinforcements for the turn were a Nephilim and a Teraph.

The Raek did a bit more damage to the White Mane while the Archers, after moving behind Absylonia, shot the second White Mane for a small amount of damage and kill one Bloodtracker. The Nephilim killed a second Bloodtracker and the Teraph's shot at the White Mane missed and deviated harmlessly.
Absylonia mutated to do Brutal (boosted) Damage and attacked the Warpwolf. While she hurt him for an impressive 17 points of damage, it was not enough to kill him.
It took a charging Seraph to take out the last of the Ravagers and the Carnivean attempted to take out the Warpwolf. Unfortunately it's spray misses both the Warpwolf and Absylonia.
Circle Turn 4Morvahna leached to full Fury but was forced to leave one on the Pureblood. The beast passed his Threashold check and Morvahna chose to upkeep Regrowth and Harvest.

The Wolfriders began their charges. One charged the Shepherd and killed her, those on the Archers and Absylonia missed and the Wolfrider on the Teraph did a measly one point of damage. The final Wolfrider ran back to Morvanha. Those that had charged then got out of the way.
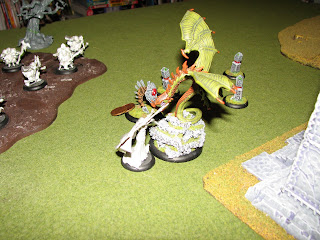
The Pureblood moved forward, hoping to get into range to power up the Warpwolf but he was just a little too far back. The Warpwolf attacked Absylonia and did 6 points of damage, but the second 6 point hit was transferred to the the Teraph.
I had one last thing I could throw at Absylonia and hope for the best. The remaining White Mane charged Absylonia and cleaved her in twain with his giant axe.
AfterwordMyantekI'm not used to my Warpwolf charging things and failing to kill them. It's a little... unsettling. And I should get used to putting Knock Down counters on stuff that's knocked down. All that stuff with Typhon Frenzying couldn't have happened because it would've been knocked down. Oops.
Actually, I probably could have been a little more aggressive with my force. I was a little gun shy I guess after the last game where Typhon managed to win it before it even began. In my defense, it was my first time playing with the White Manes, Wolf Riders, Lanyssa and Morvahna. I kind of like this force though. I could see playing it regularily.
DefenstratorWell that game was alot more satisfting than our previous one, but oh boy did I mess up. On the final round I took the fury off the Carnivean and Seraph, figuring I would get three boosted to hit and damage rolls with Typhon to wipe out the Warpwolf when I used the Shepherd to direct Typhon's frenzy. After the fury removal I announced such, to which Myantek replied Typhon only gets one attack. I look her straight in the eye and agree with her, becuase he does. He's only got the one weapon and I know that. I just had a total brain freeze moment and forgot it for some reason. Typhon is still full of fury so I have him frenzy anyway, but it's a bad damage roll and just scratchs the Warpwolf. So instead of having Typhon rip the Warpwolf apart or just toss him he instead does virtually nothing.
The true irony of the situation though is that we both forgot that Typhon was actually knocked down, and if he frenzied could do nothing. If either of us had remembered I would have taken the fury off him for sure, and my next mistake would have been prevented. So if something gets knocked down be sure to remember to put that knockdown counter by it right away. It could cost you the game if you don't.
I then didn't get lucky and put the Warpwolf into Torpor with the Shepherd, meaning Absylonia had to boost her to hit rolls. This ended up puttng me in a awkward position becuase my last attack roll missed. Instead of killing the Warpwolf and reaving his fury, Absylonia was sitting there with one fury and I was faced with a horrible choice. I was one fury short to cast Blight Field to stop the Warpwold from using fury, so I could either go for it and hope that my last attack hit and killed it and I could reave the fury, or I could hold onto the last fury point and hope to survive the turn. I chose the latter and it almost worked, untill the White Mane charged in and rolled a fifteen for damage. Still, even with the mistakes it was more fun than our previous sudden death game. I don't think we will feel the need to come back to this scenario a fourth time though.


 und. The Wolfriders (except the Huntress who stayed near Morvahna) all ran around the outskirts of the army with the Bloodtrackes on the left and the Ravagers on the right supported by the White Manes. After witnessing the spray of the Carnivean Morvahna moved back slightly and cast Regrowth on the Wolfriders and Revivify on the Ravagers.


 Krueger cast Skyborne and Wind Storm before moving in front of the trees. The Woldwyrd followed him and was riled for 1 Fury.